
How to Change Your Car’s Air Filter: Quick & Easy DIY Guide
diy saturday
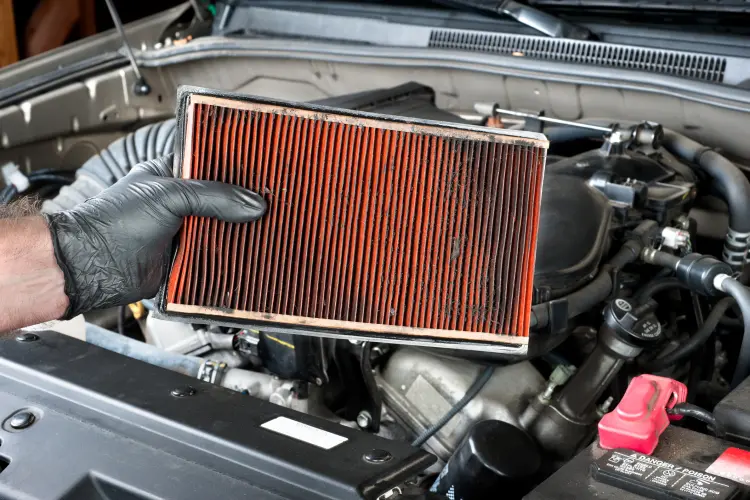
10,503A clean engine air filter is critical for optimal performance, fuel efficiency, and engine longevity. Over time, dust and debris clog the filter, restricting airflow and forcing your engine to work harder. Fortunately, swapping in a fresh air filter is an easy DIY task you can tackle in under 15 minutes with no special tools. Here’s how:
Why Replace Your Air Filter?
- Improved Fuel Economy: A clean filter ensures proper air–fuel mixture, helping you get the most miles per gallon.
- Better Performance: Unrestricted airflow lets your engine breathe freely, delivering smoother acceleration.
- Reduced Emissions: Cleaner combustion means fewer pollutants exiting your tailpipe.
- Engine Protection: Capturing dirt and debris before they enter the engine prevents wear on internal components.
Most manufacturers recommend replacing the air filter every 12,000–15,000 miles, but if you drive in dusty conditions, check it more often.
What You’ll Need
- New air filter (consult your owner’s manual or parts dealer for the correct part number)
- Flat-head screwdriver or socket wrench (depending on your filter housing)
- Clean cloth or rag
- (Optional) Compressed air canister for a quick housing clean
Step 1: Locate the Air Filter Housing
- Pop the hood and secure it.
- Look for the airbox—usually a black plastic box near the front or side of the engine bay with a large intake hose.
- Identify the clips or screws that hold the lid in place.
Step 2: Remove the Old Filter
- Unclip or unscrew the housing fasteners.
- Lift off the lid and set it aside.
- Carefully pull out the dirty air filter—note its orientation so you install the new one correctly.
- Inspect the housing for leaves, debris, or standing water; wipe it clean with a rag or blow out gently with compressed air.
Step 3: Install the New Filter
- Compare the new filter to the old one to ensure it’s the correct size and shape.
- Slide the new filter into the housing, matching the airflow arrow (if present) or the same orientation as the old filter.
- Make sure the filter’s seal sits flush against the housing walls to prevent unfiltered air leaks.
Step 4: Reassemble the Housing
- Replace the housing lid, ensuring any alignment tabs engage properly.
- Snap the clips back into place or tighten the screws just until snug—avoid overtightening, which can crack plastic.
- Give the housing a gentle tug to confirm it’s secure.
Step 5: Final Check
- Close the hood and start the engine.
- Listen for any unusual intake noises, which could indicate a misaligned filter or loose housing.
- Note that fresh filters may improve throttle response immediately.
Pro Tips for Longevity
- Inspect Monthly: In dusty environments, check the filter every oil change.
- Use Quality Parts: Opt for OEM or high-quality aftermarket filters with proper seals and pleat construction.
- Record Service: Log the date and mileage of each filter change in your maintenance record or app.
- Upgrade When Needed: Some performance filters improve flow, but be sure any upgrade still filters fine particles effectively.
Changing your air filter is one of the easiest, highest-ROI maintenance tasks you can do. Clean airflow means a happier engine, better mileage, and reduced emissions—all with just a few minutes under the hood. Give this DIY job a try at your next service interval and breathe easy knowing your engine is protected.
TL;DR: A clean engine air filter is essential for peak performance, fuel efficiency, and engine protection. In under 15 minutes and with just basic tools, this guide shows you how to locate your airbox, remove the old filter, install the correct replacement, and reassemble the housing—so your engine breathes easy and runs stronger.
— Demetrius McGee